• FAQ
  • Contact Us
  • My Account
  • My Orders
  • Gift Card
  • Cart
  • Shop
  • Nav Social Menu

    • Facebook
    • Instagram
    • Pinterest
    • Twitter

Three Little Blackbirds

Small Farm | Artisan Bakery | Graphic Design

  • TLB Blog
    • Chicken Care
    • DIY/Crafts
    • Recipes
      • Seasonal
        • Summer
        • Spring
        • Fall
        • Winter
      • Cakes
      • Frostings
      • Cookies
      • Breads
      • Muffins
      • Pie
  • Graphic Design Services
  • Shop our Store
    • Logos & Graphic Design
      • Logo Creation
      • Custom Logo Products
    • Rubber Stamps
      • Pre-Designed Egg Carton Stamps
      • Custom Stamps
      • Return Address Stamps
    • Apparel
    • Farm Goods
  • About our Farm
    • Meet Erin
    • Willow’s Story
  • Fresh Eggs

in Bread

Wild Yeast Sourdough Starter

Growing your very own starter from scratch can be quite rewarding. It does take a little bit of TLC and time, but once your culture turns into an active, bubbly starter that can be ready to bake with in just a half day’s notice, the process will seem like a breeze.

If you don’t want the hassle or time constraints of growing your own, you can purchase our organic, wet starter here

 what you will need before beginning…

  1. A tall transparent container, or large wide mouth glass jars (something you can fit your hand/wrist in to comfortably stir)
  2. A thin plain tea towel that you can cut or tear into small squares
  3. A few rubber bands (I save the ones that come off of produce you buy at the grocery store)
  4. Instant read thermometer (optional)
  5. Rubber Spatula
  6. A way to mark volume (tape, piece of paper, post it note, etc.)
  7. Kitchen Scale (you will use this for your starter AND your Sourdough bread, so this is a necessary investment if you don’t have one)

Flour:

To get the culture growing and then to feed that beautiful good bacteria, we are going to need some good quality flour. This doesn’t have to be the most expensive flour you can get your hands on, save that for the actual bread you will be baking! We do, however want a healthy robust starter…and that means flour without any added chemicals or preservatives. You will need two types of flour:

WHITE FLOUR – You can use a white bread flour or just a regular all-purpose flour (I prefer all-purpose). Do check the labels though and make sure the flour contains malted barley flour (some white flours don’t). My flour of choice for a beautiful starter is Central Milling Company Organic All-Purpose flour. The ingredients are just organic wheat flour and organic malted barley flour AND I can get two big bags of it at Costco for an excellent price (win win!). Tip: If your Costco doesn’t carry it, you can make a request and they will usually order it in!

RYE FLOUR – Any rye flour will do here. We just want to bump up the nutrition available to the bacteria so they will feed and multiply like good little yeast beasties should.

Water:

Filtered tap water is best. Bottled water is good too. Definitely NOT distilled water and definitely not tap water that is softened (with a water softener). You don’t want the chlorine present in plain water out of the tap, but you DO want the minerals that are typically removed with a water softener. If you have a refrigerator that dispenses filtered water, that will be your best bet. You will want to use warm water (just in the beginning few days while growing your culture), and I don’t know of any filtered water that comes out warm, so be prepared to microwave your water or warm it using any method of your choice to bring the temperature of the water up to about 85 degrees. An instant read thermometer will help tremendously, but if you don’t have one – test the water with your pinky finger (it should feel just the slightest bit warmer than neutral. Er on the side of cooler rather than warmer).

 feeding and discarding your culture…

Your flour and water mixture will be a culture until it is mature and stable enough to be considered a “starter.” The process of feeding will involve discarding a portion of the culture/starter and feeding back flour and water to the amount that remains. This is all done by weight, not by volume, which is why it is important to have a kitchen scale.

Feeding flour and water by weight

If you intend to use the same container the whole time while growing your yeast, you will need to know the starting weight of the container. This way you will be able to subtract that amount from your remaining culture after discarding. This may sound complicated, but I promise you it’s not. I will explain everything down below in the daily step-by-step instructions. If you have multiple containers (such as a few wide mouth glass jars) you can simply use a new jar each time you feed. Just make sure to zero out the scale before pouring some of the existing culture into your clean jar, and then washing out the old jar while discarding the rest of the culture you won’t be using.

Discarding

Once your culture grows up into a ripe starter, you can begin using the discarded amount in things like sourdough pancakes or waffles, or this Sourdough Banana Bread recipe, all of which are delicious in their own right. But until then, think of it as just a small amount of flour and water and try not to be sad when you dump it down the drain. There really won’t be any “good guys” in there just yet, so it’s not very useful for anything.

Why discard at all?

The reason you must discard some of your culture or starter first is that the feeding process assumes that your culture (at first) will grow in volume, and then eventually when it becomes a true starter, should completely double its volume in 8 hours or so. If you never discarded any of the mixture, you would end up with gallons upon gallons of starter and I’m sure you can imagine why this is unwanted and unintended. Remember that the amount of culture/starter left over is the amount you will feed back, so you can also imagine how much flour you would go through just to keep your gallons of starter alive and fed. In short, we discard in order to make less and feed less culture/starter.

Feeding Schedule

Your growing culture is going to be like a new pet or baby, minus the crying or potty demands. It will rely on you to feed it in a timely manner and keep it nice and warm and happy. Besides the first day, your culture will need to be fed around every 12 hours. You will need to plan accordingly, based on your schedule, what time of day works best for you. For me, it’s around 9:00. By 9:00 AM I am up and awake and have had my coffee and my brain can process numbers, for the most part 🙂 And around 9:00 PM I am still awake and it’s not too late for me to feed before heading off to bed for the night. Find a good time that works for you both AM and PM.

Let’s grow some yeast! Ready, set, GO!

100% hydration wild yeast starter
Printable Recipe

DAY ONE

  1. Have your chosen container clean, dry and ready to go. Set the empty container onto your kitchen scale and write down the weight (in grams) on a piece of paper, then zero out the scale.
  2. Add to your container 100 g water, then zero out the scale
  3. Add to your container 50 g white flour, then zero out the scale
  4. Add to your container 50 g rye flour
  5. Remove container from the scale and mix or stir until well combined
  6. Using a rubber spatula, scrape down the sides of the container and smooth the top of the culture as best you can
  7. Place a piece of tape or the bottom of a sticky post it note to the outside of your container to mark the height of the mixture you just created
  8. Remember the weight of your container you wrote down in step 1? Write that onto your tape or piece of paper along with the current time of day
  9. Cut or tear your tea towel into a square that will fit on the top of your container with some hanging over and secure the square with a rubber band or alternatively tie with kitchen twine. We want to protect the culture from anything unwanted getting in, but we also want to allow oxygen to enter and accumulated gas to exit
  10. Place your new culture in a warm cozy spot to rest for 24 hours.

DAY TWO A.M.

  1. There may be some signs of life, and there may not. Has the culture risen in height at all? Any bubbles? Check the bottom of the container. Even one or two bubbles at this point is a great start. If the culture has risen since yesterday, even the tiniest bit, or you see even one bubble – proceed to the next step. If absolutely no signs of life are present yet, don’t fret, just set it back in its warm spot and wait another 12 hours before proceeding.
  2. Weigh your container with the culture and subtract the container weight (written on your tape/paper marker) this will give you the weight of your existing culture. Discard all but 75 g of the culture mixture
    -or-
    Place a new container or jar onto your scale and then zero it out. Pour 75 g of culture into the new jar. Wash old jar with remaining culture to be discarded.
  3. Add to your culture: 75 g water – stir to combine
  4. Then feed with: 50 g white flour and 25 g rye flour – stir to combine
  5. Scape down the sides again and mark the height on the outside of the jar with your tape or paper
  6. Replace the tea towel covering over the top and place the culture back in its warm spot

DAY TWO P.M.

  1. You may see more activity or signs of life now, or it may be the same as this morning. Anything from a single bubble to actively rising is a wonderful sign of progress.
  2. Repeat all of the same steps from the morning – discarding all but 75 g of existing culture and feeding with 75 g water – 50 g of white flour – 25 g rye flour
  3. Return it to its warm spot again after mixing

DAY THREE A.M. AND P.M.

  1. Sometime on day 3, your culture may appear dead or sluggish. Its usually not. Just carry on and feed exactly as you did on day two

DAY FOUR AND BEYOND

  1. Continue to feed as you have been doing, but by the morning of day 4 and the next subsequent 12 hr feedings, you should begin to notice your culture becoming much more active with each and every feeding.
  2. You will soon start to see a lot more bubbles, and the culture will begin to increase in volume substantially
  3. Once you go to feed and notice that the culture has come close to doubling itself (in 12 hours or less), start feeding with white flour only. This typically and usually happens by the end of day 4, if all has gone well.
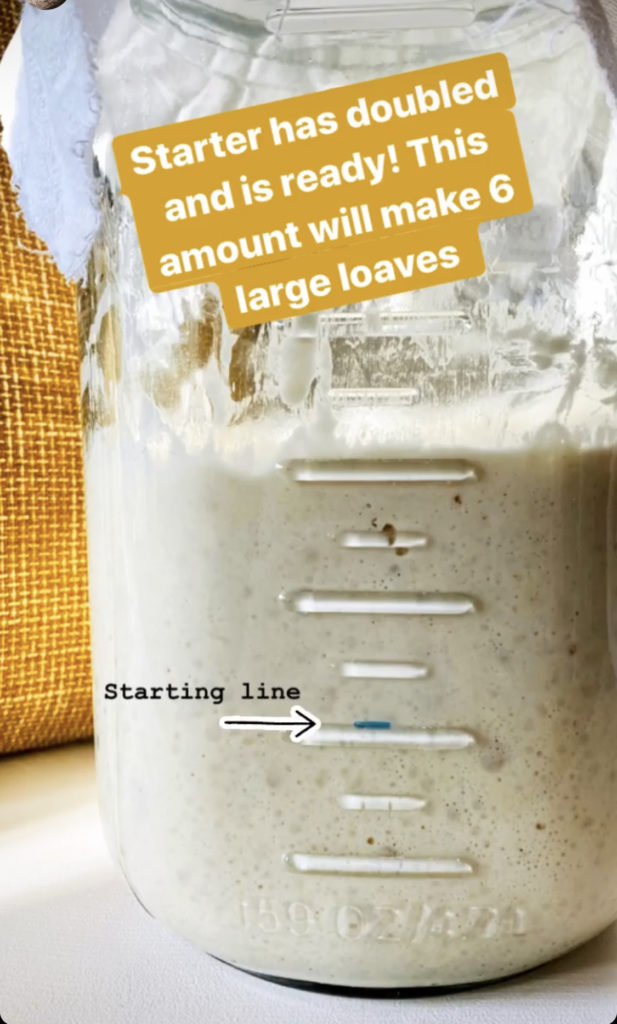
  4. When your culture can double itself in just 8 hours, is full of beautiful bubbles, and smells pleasantly sour – it is ready to bake with! (approx 5-7 days)
  5. Congratulations! You have raised a healthy, ripe 100% hydration starter that will naturally leaven the most lovely home baked Sourdough loaves.
  6. Since your baby culture has graduated into a grown up starter – why not give it a name?  It is your new pet after all.  I think the name Erin is quite nice for a jar of sour goo  😀

P.S.  If you’re not going to be baking off loaves of Sourdough bread every day, store your ripe starter in the fridge and feed once a week.  The night before you intend to start making your bread dough, pull the starter out of the fridge and leave in its special spot over night (my starter lives in the pantry with the door closed).  The next morning when you wake up, feed your starter as before, discarding or not discarding based on how much starter your recipe calls for.  By the time you are ready to start your dough later that day, your starter should be ripe and active again and ready to bake with.

SaveSave

SaveSave

SaveSave

SaveSave

SaveSave

SaveSave

SaveSave

SaveSave

SaveSave

SaveSave

SaveSave

Previous Post: « Coop Cleaning Tips
Next Post: The BEST Sourdough Bread »

Reader Interactions

Comments

  1. Wendy says

    May 4, 2020 at 2:54 pm

    I think I killed my starter, I need help. This is my first attempt at sourdough and I thought I had it all figured out, but not to be. Things started a little slow and I didn’t see bubbles until about the 36 hour mark. I fed the starter that evening and when I went to feed the next morning it had grown!, I was so pleased! I do keep the starter in the oven with a small 5watt light type bulb in it. The temp stays pretty consistent between 72-75. It was cool in the house that morning so I thought I would give some extra warmth by turning on the oven light. Well, I forgot about it for about an hour and when I went to check it the oven was at about 88, I thought I had baked it! Imagine my surprise when I went snooping about 7 hours later and the started had doubled and looked fantastic. It stayed like that for another day, 2 feeds, and now it is deflated and nothing has happed for 3 feeds. Do I toss it and start again? I don’t know what happened…

  2. v says

    May 29, 2020 at 12:02 am

    “Yeast beasties” cracked me up. Lol

  3. Tara says

    June 5, 2020 at 1:14 pm

    Can I use whole wheat flour instead of all purpose flour?

Primary Sidebar

farmer & baker & designer

From Graphic Designer to Pastry Chef to Chicken Farmer, my career path has been quite the squiggly line. But today, I am able to use all of those crafts and knowledge at Three Little Blackbirds to offer rare breed hatching eggs, artisan bakery recipes, custom graphics and logos, and goods for the home and farm. All designed and packaged beautifully with love and care. Read More...

looking for something?

You can find us here…

  • Email
  • Facebook
  • Instagram
  • Pinterest
  • Tumblr

Join me on Instagram

I can’t stop crying… 🌷💖🌷💖 Repost I can’t stop crying… 🌷💖🌷💖

Repost from @safeinaustinrescue
•
Tulip, or Auntie Tu, which We affectionately call her in the morning as she watches the three boy goats go crazy for their morning bottle, is probably the best goat Aunt I have ever met.

She's stepped into a protective role, which can only be compared to one of a caring and protective aunt. She could have been resting on the other end, and the next thing I know, she's at my knee, looking up at me, giving me a look, that seems to say, "You better take care of my boys", and when I return them all fed, she hurries over to check them out, and makes sure they know she didn't go anywhere. 

She pays extra attention to Fred, who is blind, and gently tries to steer him towards the gate. 
Gives Hercules and Orion the "look" when they start trying to jump over the gate in a rush to get fed. 

Since the boys started staying in that stall, Tulip has been a constant presence. She gets out, runs around, but never strays too far from them in the barn, even when she's getting her exercise. It’s like she knows, their mama’s couldn’t take care of them… they were brought to me, to cherish and protect, as if they were my own. 

How many of us have kids that are not our own, and yet we feel responsible and protective over them? Our friends children, children within our family, or children we teach or work with. Tulip gets that. These boys aren't hers, but she loves them in a fierce and protective way that only she can. They don't need to be hers, for her to put them first as if they were. To show them the ropes, to teach them those lessons that if mom could, she would. 

Let's celebrate those who step in to fill the role of mom this Mother's day. The ones who love children so unconditionally, and help to raise them to show that same unconditional love. 

Join us on Saturday morning to celebrate Tullip and mother’s of all types from 10am-12pm with pancakes and love. The link to RSVP is in our bio!
The hens are definitely back to work after a Winte The hens are definitely back to work after a Winter of resting. It’s time to make some quiche and angel food cakes! #springishere
The minis are not so patiently waiting for fresh g The minis are not so patiently waiting for fresh green grass to munch on. Spring has not quite fully sprung here with unseasonably cooler nighttime temps and fluctuating weather that seems just a tad crazier than past years - even for Texas! I did, however get the garden almost fully planted, which might be the earliest yet. Livin on the wild side! 😜🤞🏻🙏🏻🌱
BUSTED! We heard the goats going crazy a couple of BUSTED! We heard the goats going crazy a couple of evenings ago, so we went to investigate and found a stall door open. We know we remembered closing it and we’re so confused so we checked the camera feed and found the culprit 🤣

Rosie the herd queen and food pig was found breaking into the stall next door to steal her friends food! So naughty!! 

We will be changing out these latches now because of her. She made that look wayyyy too easy!!
Hello there lovely. 🤎 Hello there lovely. 🤎
Stella Bella hanging out in a big pile of leaves i Stella Bella hanging out in a big pile of leaves is a whole mood. 🍁🍂

The older she gets the more regal and beautiful she’s becoming 🤩

But swipe to see the video at the end to see her true personality. 100% goofball 🤣 This girl is a gem. #greatpyrenees
Eggs so pretty, you gotta put em on display. @anth Eggs so pretty, you gotta put em on display. @anthropologie
Happy national prep day! May your sourdough have Happy national prep day!

May your sourdough have a perfect crumb and your pie crust be flaky. May your cranberry sauce not be too tart and your turkey brine perfectly salty. 

What are my U.S. friends prepping today? If you have a ripe sourdough starter it’s not too late to make a batch of my sourdough bread to bake up tomorrow morning. It makes two loaves so if you only need one, you can put the other in the freezer. But let’s be real… fresh crispy #sourdough dipped in homemade gravy… you’re gonna need the two loaves! 😁🤤🥖Recipe link in bio!
I love passing by and catching a glimpse of the ba I love passing by and catching a glimpse of the barn back there. ✨ doors are being built this week and we will hang them after Thanksgiving. Woo hoo! #progress
Is it the weekend yet? Who else is in need of so Is it the weekend yet? 

Who else is in need of some dirt road therapy? When Corey and I lived in Colorado, we would take the kids and the dogs and head towards the mountains to see the Aspen trees changing colors this time of year. With our coffees, and a good book we were reading packed in our bags, we would find a new dirt road and get lost looking for those twinkling golden leaves. We’d spend the afternoon surrounded by nature, with dirt on our boots and fresh air in our lungs. Whenever I think about needing a “reboot” I think about those trips to the Aspen trees and the smell of the dirt roads and the excitement of exploring somewhere new. 

I made this shirt to remind myself to get more dirt road therapy no matter where I am in my life, maybe it will help you too 🤎
STILL pulling cherry tomatoes out of the garden in STILL pulling cherry tomatoes out of the garden in November. Gotta love the weather in Texas 🍒🌿🍂
These two are such characters. I never would have These two are such characters. I never would have thought that when we got an #LGD she would bond with our horses, as that’s kind of a rare situation and typically LGDs and horses/donkeys don’t mix well, so I’ve heard- but Stella has made a family with the minis and is inseparable with Nutmeg. 

At 9 months old, she still shows her adolescence and immaturity when she’s around the goats and chickens, but when she’s with the minis it’s like she’s a different dog- cool, calm, sweet and chill. Still a total goof ball that trips over her own feet and chases her tail BUT she respects the horses and she seems to have a protective nature when she’s around them so I feel like she takes her job more seriously when she’s around them, rather than wanting to “play” like she does sometimes around the goats. 

No playing with your charges, Stella! 🙈

BTW, when we first got Stella I *almost* got two Great Pyrenees puppies at once thinking she would be lonely in the pasture and would need a friend to grow up with. Thank goodness my sweet friend Renee from @mountainwoodsfarm was there to virtually slap my hands away from the second puppy and say NO! lol and then proceed to enlighten me on “litter mate syndrome” if it weren’t for her and her knowledge helping me through in the beginning I would have been lost. She’s your best source for anything and everything you ever needed to know about working LGDs and is #onetofollow 🙌🏻
I know my husband and I built this little beauty w I know my husband and I built this little beauty with our own hands because I was definitely here for it, but after we got done painting her this clean farmhouse white to match our house and chicken coop, I wanted someone to pinch me because I felt like I was dreaming! ☁️ 

We have wanted this barn for so long and have been building since March and it’s so satisfying to finally have a structure to start putting the final touches on. 3 sets of big barn doors and the exterior stall doors are coming up next along with shingling the roof and electrical and exterior extras like window shutters and faux hay loft windows. 

Still so much to do but we’ve come so far and I’m so proud of how it’s turning out! 

BTW, we made our own plans for this barn. I drew up the design and Corey made the building plans since we couldn’t find barn plans available that we liked.
My dreams for Tulip came true today you guys. Re My dreams for Tulip came true today you guys. 

Remember when I said from the beginning that I wanted her to be with other special needs animals just like her? And maybe even make a difference in a special needs child’s life too..

She got to experience that today and then some with my friends over at @safeinaustinrescue 🥺🥰 What these gorgeous people are doing is so heartwarming and we had the best time touring their beautiful place and meeting all the amazing animals. 

Seeing her there with all the people and the little children, wheeling around with the 3 legged doggies and the sheep that walks on her front knees, goats, cow and the sweetest little calf in the special needs animal pen almost made my heart burst into pieces. And then Corey “got dust in his eyes” and started the waterworks and we all got sappy and emotional and you just can’t help it because there’s something just *magical* about this ranch. Only good things happening here. 

So. Much. Love.

Palpable love. The kind that just gives you chills right up your spine. 

Tulip is so very special to us and the idea of her helping bring light into someone’s life like she did for us, and bring a smile to a child’s face is what gets me through even the saddest of times. 

Thank you so much to all of the people and volunteers at @safeinaustinrescue !!
🌷🌷🌷🌷🌷🌷🌷
Where’s my goat people at? The Greatest.Of.All. Where’s my goat people at?

The Greatest.Of.All.Time. 🐐 No wonder goats are such divas 🤣 We still love em though! 

Speaking of diva goats we love…Tulip has her amputation surgery tomorrow morning. I am so nervous for her! 😩send all your prayers and love this way, please 🙏🏻🌷💖

New merch in the apparel shop 🛒
Follow us on Instagram

Get our monthly newsletter

It includes announcements, new products, discount codes and the inside scoop on hatching egg availabilities!

Footer

About the owner

My name is Erin. I am a mother of three, chicken farmer, gardener, pastry enthusiast, and self-proclaimed food snob. I love to dig in the dirt. I love to ride horses. I love the smell of lavender and roses and lilacs and hay. I am a dreamer, but kneading bread dough keeps me Earth bound. Im glad you're here! Read More...

Texas Small Business Proud

Need to Track an Order?

Visit our Tracking Page here

Looking for something?

Let’s connect!

  • Facebook
  • Instagram
  • Pinterest
  • Twitter

Copyright © 2022 Three Little Blackbirds